Class I MHC Tetramer Preparation: Overview
Production of MHC Tetramers can be broken down into a series of discrete steps:
Vectors for MHC expression in E. coli
E. coli expression of MHC chains in Studier "autoinduction" media
Preparation of inclusion bodies
Folding of class I MHC molecules
Concentration and biotinylation of BSP-tagged MHC/peptide monomers
S300 column chromatography
MonoQ column chromatography
Preparation of the monomer stock
Biotinylation assay
Tetramer Preparation: addition of streptavidin.
Notes on tetramer nomenclature.
Time Considerations
- Step 1 involves normal molecular biology manipulations such as PCR amplication of the MHC gene fragment, cloning, and sequencing. It can be easily done in a week. There is no important temporal connection between this step and the other steps. Only the general features of the vectors are described here; the details on cloning and sequencing are commonplace and can be found in common molecular biology manuals.
- Steps 2 and 3 are connected and can be performed in 2 days. The autoinduction cultures are grown overnight, and collected in the morning. The inclusion bodies are processed that same day.There is no need or rationale for freezing of E. coli pellets; on the other hand, freezing of the pellets probably doesn't do any harm.
- Step 4 can take 2-5 days. As far as I know, the MHC and the BSP tail are stable in folding buffer, and it is not crucial to proceed quickly to the subsequent steps.
- Once you begin step 5, it is important to proceed through the completion of step 8 as quickly as possible.While the globular domains of an MHC molecule are relatively stable and resistant to proteases which might contaminate the preps, the BSP tag is a linear, unstructured entity that is highly susceptible to proteolysis. Rapid completion of the purification through storage at -80 °C will minimize cleavage reactions that inhibit tetramer formation.
- The samples for step 9 can be stored at -80°C prior to assay, so it is not crucial to perform this step immediately. However, there is no reason to not perform this step within a week of the completion of the purification of the tetramer.
- Step 10 takes about two hours. Once the monomers are bound to streptavidin, the BSP seems to be more resistant to proteolysis, perhaps because the proteases can't get near the BSP without bumping into the streptavidin.
Step 1: Class I MHC Tetramer Preparation: Expression Plasmids
The basic strategy for production of class I MHC/peptide complexes from denatured subunits produced in E. coli was originally defined by Garboczi and Wiley in 1992. For tetramer production, the heavy chain is fused to a BirA substrate peptide (BSP•41), derived from the libraries constructed and screened by Schatz for sequences that are biotinylated by the E. coli enzyme BirA. Both the heavy chain and b2m subunits are expressed as insoluble inclusion bodies, which are solubilized with common denaturants such as urea or guanidium chloride prior to folding in vitro. Many different E. coli promoters will drive expression to high enough levels to result in inclusion bodies. For expression of the b2m subunit, we still use the original plasmid in the pHN1 vector described by Garboczi and Wiley; this plasmid uses a hybrid trp/lac promoter (the so-called tac promoter), which is IPTG or lactose inducible. In contrast, for expression of the class I heavy chains, we have replaced Garboczi and Wiley's pHN1-based vector with any of a variety of pET vectors (Novagen), which use the powerful T7 expression system pioneered by Studier and colleagues, simply because the pET vectors are more widely available and somewhat more convenient for subcloning new MHC genes.
Detailed protocols for the basic molecular biology techniques required to subclone new MHC alleles into our vectors are beyond the scope of this web page; these techiques are commonplace in nearly all modern immunology laboratories. The purpose of this page is to provide a brief description of our vectors, and the simple strategies that we employ for subcloning new MHC alleles.
Expression plasmids
The plasmids that we have built for expression of class I MHC heavy chains are nearly all based upon the plasmid pET24a+ from Novagen. The basic features of pET24a(+) are as follows:
- The origin of replication is based upon pBR322, and results in copy numbers that are between pACYC-based plasmids and pUC or pBluescript-based plasmids.
- Kanamycin is used for selection of transformed E. coli. Most manuals recommend concentrations of kanamycin in the range of 25-40 µg/ml. In contrast, we have adopted recommendations of F. W. Studier, and use kanamycin concentrations of 100 µg/ml.
- An f1 origin is provided, permitting production of single-stranded DNA in a bacteriophage. This feature is in some sense a remnant of the days when both mutagenesis and sequencing required production of single-stranded DNA, so-called phagemid technology. Single-stranded DNA is no longer required for these purposes.
- The promoter that drives expression of the recombinant heavy chain is a hybrid T7-lac promoter. In the presence of the lac-Iq repressor, the T7-lac hybrid provides lower basal levels of expression compared to the original T7 promoter.
- The lac-Iq repressor is expressed from a constitutive promoter. This provides the protein that binds to the lac operator in the T7-lac hybrid promoter, and that results in better suppression of protein expression in the absence of the IPTG or lactose inducer.
- At the 5' end of the expression cassette, we use either the NdeI or NheI restriction sites for cloning. If the MHC allele of interest lacks an Nde I site, we use it for cloning; otherwise, we use the NheI site.
- At the 3' end of the expression cassette, we have inserted the sequence for the BirA substrate peptide (BSP), described below. We have prepared two versions of our basic vectors, with and without the His•tag fusion following the BSP.
pTCF33: a vector for expression of proteins fused to BSP41 The plasmid pTCF33 is designed for cloning genes to produce protein fusions to BSP41. It is based upon pET24a+, and has the following additional features:
- In order to produce C-terminal fusions, the 3' end of the construct contains the coding sequence for BSP41, in frame behind Kpn I and BamH I restriction sites. The BSP41 sequence is followed by a stop codon. These sequences were cloned in at the Hind III site. If your gene of interest does not contain a BamH I site, then you should clone into the BamH I site. Otherwise, you should clone into the Kpn I site.
- An irrelevant 2kb stuffer fragment is present upstream of the Kpn I site. This is solely designed to facilitate screening of subsequent recombinant plasmids.
- At the 5' end, the 2kb stuffer fragment is cloned in behind Nde I and Nhe I sites. If your gene of interest does not contain a Nde I site, then it is preferred for cloning, as it does not result in additional amino acids at the N-terminus of the protein (other than the initiator methionine). However, cloning into Nde I sites is somewhat more difficult than cloning into many other restriction sites, and some investigators may prefer the Nhe I site. Of course, if your gene contains an Nde I site, then you should clone into the Nhe I site.
We have prepared two variants of pTCF33—pTCF33.HisV1 and pTCF33.HisV2—that contain His6 tags follwoing the BSP. We haven't used these vectors much, and the His tag is generally not required for purification. We are investigating His-tagged variants for rare cases where proteolysis of the BSP is a significant problem that is not solved by standard methods. Please note that we have found that metal ion affinity columns are not compatible with the arginine folding buffer, so that this technique cannot be used for affinity purification directly from the folding reaction.
Please contact us for questions, maps or other information regarding specific class I MHC alleles.
Step 2: Studier Method for Autoinduction of Protein Expression in the T7 System
This protocol describes the production of recombinant proteins in bacteria using the T7 polymerase expression system originally developed by F. W. Studier and colleagues (often known as the pET system, sold by Novagen but available from other suppliers such as Promega, Stratagene, and Invitrogen). This protocol uses a method developed by Studier that provides for “autoinduction” of protein expression without the need to add inducers such as IPTG during mid-log phase of the cultures. The method is based upon a buffered medium that contains a mixture of carbon sources, including lactose. The bacteria initially use glucose; when the glucose is exhausted, lactose can enter the cell and induce expression of the T7 polymerase from the DE3 lambda lysogen. The medium provides high culture densities and high yields of proteins, usually in inclusion bodies. It is used extensively by the Tetramer Core Facility for the production of MHC subunits used during the preparation of MHC tetramers, but may also be used for the expression of other recombinant proteins that are ultimately driven by the lac promoter.
Innoculum cultures are grown in P-0.5G, a defined minimal medium for growth to saturation at high densities with little or no induction of expression of the target protein. According to Studier:
- Cultures grown (in P-0.5G) at 37 °C typically saturate overnight at A600 ~ 4-7 and pH ~6.5, are quite stable for a week or more in the refrigerator, and grow subcultures with little lag. Fresh overnight cultures in P-0.5G make freezer stocks that remain viable indefinitely and generate cultures that produce high levels of target protein.
Autoinduction cultures are grown overnight (16-20 hours) in ZYP-5052 media. Additional details, protocols, and recipes for minimal defined media (suitable for metabolic labeling of recombinant proteins with seleno-methionine) are available. We do not require these for our purposes.
Table of Contents
- Reagents
- Preparation of innoculum cultures and frozen glycerol stocks
- Growth in autoinduction media
Reagents and stock solutions
- Use deionized distilled water for all solutions
- Autoclave solutions for 15 min unless specified otherwise
Reagent List
- ZY
- 20x NPS
- 50x 5052
- MgSO4
- 40% glucose
- 80% glycerol
- 20% a-lactose
- Antibiotics
- P-0.5. A defined minimal medium for growth to saturation at high densities with little or no induction of expression of the target protein.
- ZYP-0.8G. ZYP-0.8G is a rich medium for growth to high densities with little or no induction of expression, but induction may not be as stringently repressed as in P-0.5G.
- ZYP-5052 rich medium for auto-induction. ZYP-5052 is a rich medium for growth with little or no induction during log phase and auto-induction of expression as the culture approaches saturation.
- LB Agar plates + 1% glucose
- Resuspension buffer
ZY
- 10 g N-Z-amine AS (or any tryptic digest of casein, e.g. tryptone) Sigma cat# N4517
- 5 g yeast extract We use the granulated extract from EM Sciences, available from VWR cat# EM1.03753.0500
- 925 ml water
20x NPS
| Component | 100 ml | 1 liter | mol/liter |
|---|---|---|---|
| dd H2O | 90 ml | 900 ml | - |
| (NH4)2SO4 | 6.6 g | 66 g | 0.5 M |
| KH2PO4 | 13.6 g | 136 g | 1 M |
| Na2HPO4 | 14.2 g | 142 g | 1 M |
- Add in sequence in beaker; stir until all dissolved.
- pH of 20-fold dilution in water should be ~6.75.
50x5052: (5052 = 0.5 % glycerol, 0.05% glucose, 0.2% α-lactose)
| Component | 100 ml | 1 liter |
|---|---|---|
| Glycerol (weigh in beaker) | 25 g | 250 g |
| H2O | 73 ml | 730 ml |
| Glucose (Fisher FLBP350-1) | 2.5 g | 25 g |
| α-lactose (Sigma cat# L3625) | 10 g | 100 g |
- Add in sequence in beaker, stir until all dissolved
- Lactose is slow to dissolve — may take two hours or more of stirring. Brief heating in a microwave can speed up dissolution of the lactose.
1 M MgSO4
- 24.65 g MgSO4•7H2O
- Water to make 100 ml
40% glucose (w/v)
| Component | 100 ml | 300 ml |
|---|---|---|
| Glucose (Fisher FLBP350-1) | 40 g | 120 g |
| H2O | 74 ml | 222 ml |
- Add glucose to stirring water in beaker; DO NOT ATTEMPT TO ADD WATER TO GLUCOSE!
- Stir until all dissolved — may take 45 minutesor more of stirring.
80% glycerol (v/v) (= 100% w/v)
- 100 g glycerol (weigh in beaker)
- 20 ml water
20% α-lactose w/v)
| Component | 100 ml | 600 ml |
|---|---|---|
| α-lactose (Sigma cat# L3625) | 20 g | 120 g |
| H2O | 87.5 ml | 525 ml |
- add lactose to stirring water in beaker
- stir until all dissolved -- may take 2 hours or more
1000x trace metals mixture (100 ml in ~50 mM HCl) Prepare all metal stock solutions in ddH2O, except for FeCl3, which is dissolved in ~0.1M HCl, as noted in the table below. Combine the metal solutions as in the table below.
| Component | Vol | MW | 1x conc |
|---|---|---|---|
| H2O | 36 ml | - | - |
| 0.1 M FeCL3•6H2O (dissolved in ~0.1 M HCl = 100-fold dil of conc HCl) | 50 ml | 270.30 | 50 µM Fe |
| 1M CaCl2 | 2 ml | 110.99 | 20 µM Ca |
| 1M MnCl2•4H2O | 1 ml | 197.91 | 10 µM |
| 1 M ZnSO4•7H2O | 1 ml | 287.56 | 10 µM Zn |
| 0.2 M CoCl2•6H2O | 1 ml | 237.95 | 2 µM Co |
| 0.1 M CuCl2•2H2O | 2 ml | 170.486 | 2 µM Cu |
| 0.2 M NiCl2•6H2O | 1 ml | 237.72 | 2 µM Ni |
| 0.1 M Na2MoO4•2H2O | 2 ml | 241.98 | 2 µM Mo |
| 0.1 M Na2SeO3•5H2O | 2 ml | 263.03 | 2 µM Se |
| 0.1 M H3BO3 | 2 ml | 61.83 | 2 µM H3BO3 |
Autoclave the stock solutions of the individual metals, except 0.1 M FeCl3 in 1/100 volume conc HCl.
A brief precipitate appeared upon addition of Na2SeO3, which redissolved rapidly
Store at room temperature
When making growth media, add the metals mix before NPS. If NPS is already present when 1000x metals mix is added, a precipitate forms which disperses but retains a light turbidity. If the metals are diluted to near their final concentration before NPS is added, the medium remains clear. The metals also precipitate and disperse or redissolve when added to ZY, a precipitate caused by yeast extract. Although apparently not a problem, the precipitate could be avoided by diluting the metals in the water before dissolving the yeast extract in making ZY.
Antibiotics
- Kanamycin (25 mg/ml in water, filter sterilize)
- Chloramphenicol (25 mg/ml in 95% ethanol,filter sterilize)
- Ampicillin (50 mg/ml in water, filter sterilize)
P-0.5G defined minimal medium for growth to saturation with little or no induction
- grow log-phase or saturated cultures for making freezer stocks and working stocks
- For all media, add 1 M MgSO4 and 1000x metals mix before adding 20xNPS to avoid precipitate
| Component | 50 ml | 100 ml | 200 ml | Final concentration |
|---|---|---|---|---|
| ddH2O (sterile) | ~46.8 ml | ~93.6 ml | ~187.3 ml | - |
| 1 M MgSO4 | 50 µl | 100 µl | 200 µl | 1 mM |
| 10000x metals mix | 5 µl | 10 µl | 20 µl | 1 |
| 40% glucose | 0.625 ml | 1.25 ml | 2.5 ml | 0.5% |
| 20x NPS | 2.5 ml | 5 ml | 10 ml | 1x |
| antibiotics | Choose only 1 from the list below | |||
| kanamycin (25 mg/ml) | 0.2 ml | 0.4 ml | 0.8 ml | 100 µg/ml |
| chloramphenicol (25 mg/ml) | 50 µl | 100 µl | 200 µl | 25 µg/ml |
| ampicillin (50 mg/ml) | 50 µl | 100 µl | 200 µl | 50 µg/ml |
ZYP-0.8G
- Rich medium for growth with little or no induction
- Culture should go somewhat acid at saturation (slightly below pH 6)
- Collect cultures for freezer stocks well before saturation
- For all media, add 1 M MgSO4 before adding 20xNPS to avoid precipitate
- Kanamycin is used at significantly higher concentrations (100 µg/ml) than is normally the case (25-40 µg/ml). Studier has found that in the T7 expression strains in these rich media, it does not provide adequate selection at the lower concentrations.
| Component | 50 ml | 100 ml | 200 ml | 400 ml | Concentration |
|---|---|---|---|---|---|
| ZY | ~46.5 ml | ~93 ml | ~186 ml | ~372 ml | - |
| 1 M MgSO4 | 50 µl | 100 µl | 0.2 ml | 0.4 ml | 1 mM |
| 40% glucose | 1 ml | 2 ml | 4 ml | 8 ml | 0.8% |
| 20x NPS | 2.5 ml | 5 ml | 10 ml | 20 ml | 1x |
| Antibiotics, as needed | Choose only 1 from the list below | ||||
| kanamycin (25 mg/ml) | 200 µl | 0.4 ml | 0.8 ml | 1.6 ml | 100 µg/ml |
| chloramphenicol (25 mg/ml) | 50 µl | 100 µl | 0.2 ml | 0.4 ml | 25 µg/ml |
| ampicillin (50 mg/ml) | 50 µl | 100 µl | 0.2 ml | 0.4 ml | 50 µg/ml |
ZYP-5052 rich medium for auto-induction
- For all media, add 1 M MgSO4 before adding 20xNPS to avoid precipitate
- Kanamycin is used at significantly higher concentrations (100 µg/ml) than is normally the case (25-40 µg/ml). Studier has found that in the T7 expression strains in these rich media, it does not provide adequate selection at the lower concentrations.
- We use 400 ml in a 2 liter baffled flask. Adequate aeration is essential to the performance of this media. Don't even think about using more than 20% of the nominal volume of the flask. Baffled flasks will give significantly better performance. You might obtain adequate results with non-baffled flasks, but I don't recommend it.
| Component | 200 ml | 400 ml | 500 ml | 1 liter | Concentration |
|---|---|---|---|---|---|
| ZY | ~186 ml | ~372 ml | ~464 ml | ~928 ml | - |
| 1 M MgSO4 | 0.2 ml | 0.4 ml | 0.5 ml | 1 ml | 1 mM |
| 50x 5052 | 4 ml | 8 ml | 10 ml | 20 ml | 1x |
| 20x NPS | 10 ml | 20 ml | 25 ml | 50 ml | 1x |
| Antibiotics | Choose only 1 from the list below | ||||
| kanamycin (25 mg/ml) | 0.8 ml | 1.6 ml | 2 ml | 4 ml | 100 µg/ml |
| chloramphenicol (25 mg/ml) | 0.2 ml | 0.4 ml | 0.5 ml | 1 ml | 25 µg/ml |
| ampicillin (50 mg/ml) | 0.2 ml | 0.2 ml | 0.5 ml | 1 ml | 50 µg/ml |
LB Agar plates + 1% glucose
- Sterilize LB agar as usual for pouring plates. Allow agar to cool to 55-60 °C, usually in a 56 °C water bath.
- Add 1/40 volume of 40% glucose (e.g. for400 ml, add 1 ml glucose).
- Add antibiotic to an appropriate concentration.
- Pour the plate
Resuspension Buffer
- 50 mM Tris-HCL
- 25% (W/V) sucrose
- 1 mM EDTA
- 0.1% (w/v) NaAzide
- 10 mM DTT (add fresh)
Procedure
- At the end of day 1, streak plasmid-transformed BL21(DE3) bacteria from a frozen glycerol stock onto an LB + 1% glucose agar plate with an appropriate antibiotic. Place in a 37°C incubator overnight.Alternate strains carrying carrying the T7 polymerase under control of the lacUV5 promoter in the DE3 lambda lysogen may be used. Examples include the BL21(DE3)RIL and BL21(DE3)RP strains from Stratagene which carry pACYC-based plasmids expressing tRNAs that are rare in E. coli.This procedure may also work for expression systems using the lac or tac promoters, such as the pHN1 plasmids (Garboczi et al.) which we use for expression of HLA-A2-BSP and human b2m.
- First thing in the morning on day 2, transfer a single colony from the fresh agar plate into 2 ml of ZYP-0.8G plus appropriate antibiotic in a 18 x 150 mm snap cap tube. Shake at 300 RPM at 37°C for 6-8 hours, until the culture is turbid but not saturated.Alternatively, you can use LB + 1% glucose, but you’re chances of failure increase because bacteria cultures in LB media are more likely to lose the expression plasmid when the cultures approach saturation.
- While the Inoculum Culture in step 2 is growing, prepare 6 2-liter baffled Erlenmayer flasks with 400 ml each of ZYP-5052 media plus appropriate antibiotic.Adequate aeration of the cultures is essential to achieving optimal protein expression using this method. It is essential to use baffled flasks, and to keep the volume of liquid in the 2-liter flask at or below 400 ml.The 5052 in ZYP-5052 stands for 0.5% glycerol, 0.05% glucose, and 0.2% a-lactose.
- Towards the end of day 2, transfer 200 µl of the Inoculum Culture into each of the 6 2-liter flasks containing 400 ml ZYP-5052 + antibiotic. Shake at 300 RPM at 37 °C overnight.
- First thing in the morning on day 3, cool the cultures by placing the Erlenmayer flasks containing the cultures ice buckets. Use flat, shallow ice buckets.
- While the cultures are cooling, take a 1.0 ml sample from each flask and place in a labeled 1.5 ml microcentrifuge tube. Prepare a 1:10 dilution of each sample by transferring 0.1 ml of each into each of a second set of microcentrifuge tubes containing 0.9 ml of fresh ZYP-5052. Prepare an additional microcentrifuge tube containing 1.0 ml of fresh ZYP-5052 to use as a blank.
- Measure the OD(600) of the 1:10 dilutions of each of the cultures and record the result in the Inclusion Body QC Database.This database is used in the Altman Lab to record data from Inclusion Body Preps. Others may simply record this data in their notebooks
- Pellet the bacteria in the remaining 0.9 ml by spinning the microcentrifuge at 1/2 of full speed for 2 minutes. Aspirate the supernatant.
- Resuspend the bacteria in the microcentrifuge tubes in 1X SDS-PAGE reducing sample buffer (SDS-rSB) in two stages: (1) add 50 µl of SDS-rSB (or water?) to each of the pellets and vortex vigorously to resuspend the pellet; (2) add 400 µl of SDS-rSB to each of these suspensions, to bring the total volume of SDS-rSB to 1/2 of the culture volume. These samples will be used for subsequent analysis of total bacterial protein by SDS-PAGE. The two step protocol is used to facilitate complete resuspension of the bacteria. If done in one stage by the addition of 450 µl of sample buffer, the pellets are difficult to resuspend. You won’t have to run samples from all 6 flasks, but you should run them from at least 1 or maybe two. Finally, it is a good idea to prepare an additional tube containing a 1:10 dilution of the SDS samples (in SDS-rSB) to run on the gel, in case the full-strength samples badly overload the gel.
- Check to see that the chromosomal DNA in the samples has been thoroughly sheared by vortexing. Tell-tale signs of unsheared DNA are a “stringy” consistency that is observed when the tubes are opened or when a small volume is drawn up into a pipette tip. If residual unsheared DNA remains, it can be sheared by further vigorous vortexing. As a last resort, the DNA can be sheared by sonication for 2-3 minutes using a microtip sonicator at 50% duty cycle, with the samples cooled on ice. Complete shearing of the DNA is essential to achieving a high quality SDS-PAGE gel.
- Combine the contents of two of the Erlenmayer flasks into a single 1-liter centrifuge bottle, resulting in 800 ml of bacterial culture in the flasks. Similarly combine the contents of remaining flasks into 2 additional centrifuge bottles, yielding a total of three centrifuge bottles each containing 800 ml of culture. Equalize the volume of bacteria in the cultures by eye, transferring culture liquid from one or more bottles to one a bottle that may contain slightly less liquid. Balance the bottles on a pan balance by moving liquid with a pipette from heavier to lighter bottles.
- Pellet the bacteria in the 1 liter bottles by spinning for 20 minutes at 5000 x g at 4°C.
- While the bacterial cultures are in the centrifuge, prepare an SDS-PAGE gel for analysis of total protein. You should be able to prepare at least the separating portion of the gel before the centrifuge run is completed.
- Decant the supernatants from the 1-liter centrifuge bottles into a large bucket or beaker, treat with a few hundred ml of 100% bleach, and then pour down the drain, rinsing with copious water.
- Add 20 ml of resuspension buffer to each of the bacterial pellets in the 1-liter bottles. Resuspend to homogeneity by vigorous shaking on the platform rocker in the cold room. This can take up to 20-30 minutes.Alternatively, you can resuspend the bacteria by vigorous pipetting, but this takes much more manual intervention and is a waste of your valuable time.
- While the bacteria is shaking in resuspension buffer, finish preparing your SDS-PAGE gel. In addition, set up a full 500-1000 ml beaker of water to boil for heating up your SDS-PAGE samples.
- Run your SDS-PAGE gel while you are processing the bacteria to isolate the inclusion bodies.Save the samples in SDS sample buffer for a few days, even if you've run the gel. You might want to run another gel which contains both the bacterial lysate and the washed inclusion bodies.
- Isolate and wash the inclusion bodies, following the “Inclusion Body Preparation” protocol. Do this on the same day that you harvest your bacteria, so that there is no need to freeze the bacteria.If absolutely necessary, you can snap freeze the bacteria in 50 ml screw cap plastic centrifuge tubes for processing at a later date, but you might was well get the whole thing over with.
Step 3: Inclusion Body Preparation
This protocol describes isolation and washing of the inclusion bodies. These protocols are adapted from those originally described by David Garboczi.
Materials and Reagents
Equipment (note that much of this can be replaced with similar equipment available to you)
- Disposable cuvettes
- 1 L Beckman polypropylene screw top centrifuge bottles with bottle sleeves
- 50 ml polypropylene screw top centrifuge tubes
- 15 ml polypropylene screw top centrifuge tubes
- 100 ml polypropylene beaker
- 500 ml disposable polypropylene beaker
- 25 X 89 mm Beckman Polyallomer Tubes
- Plastic (Teflon) stir rod
- Fisher Scientific stirring plate
- Beckman CS-15R centrifuge with FO 630 rotor
- Beckman JA-6 centrifuge with JS 4.2 rotor
- Fisher Scientific 550 Sonic dismembrator with CL4 Ultrasonic converter and cabinet
- Fisher Scientific Lab Jack
Reagents and Chemicals
- 50 mg/ml lysozyme
- 1.0 M MgCl2
- 2 mg/ml Dnase I in 50% glycerol, 75 mM NaCl
- Triton-X 100
- 1M DTT
Resuspension Buffer (pH 8.0):
- 50 mM Tris-HCL
- 25% (W/V) sucrose
- 1 mM EDTA
- 0.1% (w/v) NaAzide
- 10 mM DTT (add fresh)
Wash Buffer (pH 8.0):
- 50 mM Tris-HCl
- 0.5% Triton-X100
- 100 mM NaCl
- 1 mM EDTA
- 0.1% Azide
- 1mM DTT (add fresh)
Wash Buffer without Triton X-100 (pH 8.0):
- 50 mM Tris-HCl
- 100 mM NaCl
- 1 mM EDTA
- 0.1% Azide
- 1mM DTT (add fresh)
Urea Solution (pH 6.0):
- 25 mM MES (pH 6.0)
- 8 M urea
- 10 mM EDTA
- 0.1mM DTT (add fresh)
Procedure
This protocol starts with a suspension of E. coli prepared according to the autoinduction protocol.
- Pool the resuspended bacteria by tranfer to a 100 ml polypropylene beaker containing a 1/2 inch stir bar. If you've ignored my pleas not to freeze the bacterial pellets, thaw the frozen pellets prior to transfer to the beaker.
 Stir the bacterial suspension on a stir plate at moderate speed.
- To stirring mixture (usually 60 ml) add drop wise: 1.2 ml 50 mg/ml lysozyme (final = 1 mg/ml), 300 ul 1.0 M MgCl2 (final=5mM),1.0 ml of 2 mg/ml Dnase I in 50% glycerol containing 75 mM NaCl, 600 ul Triton-X 100 (final= 1%), 600 ul 1M DTT (final=10 mM).Adjust volumes accordingly if the volume of resuspended bacteria is not 60 ml.At some point in this process, usually after the addition of Triton X-100, the viscosity of the solution will increase dramatically, as the chromosomal DNA of the bacteria is released. As the DNase has a chance to digest the DNA, the viscosity will decrease.The subsequent sonication of the suspension serves a dual purpose: (1) to ensure that the bacterial are completely lysed; and (2) to further sheer the DNA that is not completely digested by the DNase. Sonication is also used throught the washing of the inclusion bodies, to ensure resuspension to homogeneity.
- Remove the stir bar from the bacterial suspension.
- Place the 100 ml beaker containing the bacterial lysate into a disposable 500 ml polypropylene beaker containing ice such that the smaller beaker is held firmly in place.
- Place the above on the lab jack inside the sonicator cabinet and insert the CL4 ultrasonic converter into the 100 ml beaker containing the bacterial lysate. Adjust the lab jack such that the ultrasonic converter is at the maximum depth without touching the bottom of the beaker.
- Sonicate the solution for 1.5 min at 0.5 sec alternations on power 4.
- Test the viscosity of the solution by drawing up an aliquot in a 1 ml pipette tip. If the solution flows freely without forming "strings", proceed to step 9. Otherwise, repeat step 7, taking care to ensure that the solution does not heat up.
- Transfer the lysates to three 25 X 89 mm Beckman polyallomer tubes and centrifuge in the Beckman CS-15R centrifuge with FO 630 rotor at Max RPM for 10 minutes at 4 °C.
- Take a 50 µl sample of the supernatant, label S1, and store at -20 °C.
- Decant the supernatant and add 1-2 ml wash buffer to the pellet.
- Fully dissociate the pellet using a Teflon stirring rod, add wash buffer to 15 ml, and continue to stir until the pellet is dispersed.
- On ice, sonicate solution for 1.5 min at 0.5 sec alternations on power 4.
- Centrifuge the samples in the Beckman CS-15R centrifuge with FO 630 rotor at Max RPM for 10 minutes at 4 °C.
- Decant supernatant and take a 50 µl sample (S2).
- Repeat this wash step 3X and take supernatant samples (S3-S5). The number of wash steps depends upon the removal of contaminating material. Usually, this is obvious, as the pellets after each centrifugation step contain concentric rings of material. The inner ring is compact and lighter in color; it contains the desired protein. The outer rings are less compact, and contain contaminants. The size of the outer ring decreases with each washing step; you should wash repeatedly until the outer ring is nearly absent.
- Resuspend pellets in wash buffer without Triton X-100 as above.
- Centrifuge in a Beckman CS-15R centrifuge with FO 630 rotor at Max RPM for 10 minutes at 4 °C.
- Decant the supernatant and resuspend the pellet in 200 ul of ddH20. Once a white paste has formed resuspend the pellets in a total 10 ml urea solution. (ie-3 pellets in 10 ml M Urea).
- Centrifuge the 10 ml of inclusion bodies in a Beckman CS-15R centrifuge with FO 630 rotor at Max RPM for 10 minutes at 4 °C.
- Transfer the supernatant to a 15 ml polypropelene screw top centrifuge tube.
- Dilute 2 µl of the above inclusion bodies in 98 µl of urea solution and take a UV scan from 240 nm to 320 nm.
- Calculate the protein concentration. Aliquot 500 nMol fractions into eppendorf tubes.
- Quick freeze the aliquots in liquid nitrogen and store at -80 °C.
- Run pre-induction, post-induction, S1-S5, and a final inclusion body sample on a 10% or 12% SDS PAGE gel. We usually use 12% gels. When running b2m on the gel, it is essential to stop the gel as soon as the bromphenol blue dye front leaves the bottom of the gel, if not before.
Step 4: Tetramer Protocols: The Folding Reaction
This page contains instructions for setting up the in vitro folding of class I MHC/peptide complexes. The protocol, used in the original preparation of MHC tetramers from Altman et al., was derived from Garboczi and Wiley.
Reagents & Solutions
Reagents for 500ml reaction:
- 0.76825g reduced glutathione
- 0.15315g oxidized glutathione
- 0.5ml 200mM PMSF
- 15mg peptide
- 500µl DMSO
- 1.5mmol inclusion bodies (heavy chain)
- 1mmol human b2m inclusion bodies (light chain)
Folding buffer (pH 8.3):
- 42.14g L-Arginine (final concentration: 400mM)
- 50ml 1M Tris (final concentration: 100mM)
- 2ml 1.5M EDTA (final concentration: 2mM)
- ddH2O to 500ml
- adjust pH to 8.3
Injection Buffer (pH 4.2):
- 3M Guanidine HCl
- 10mM NaC2H3O2 (Sodium Acetate)
- 10mM EDTA
Day 1
- Chill folding buffer. In a 1L glass Erlenmeyer flask equipped with a large stir-bar, chill 500ml of folding buffer to 10°C.
- Add first three reagents to the folding buffer. Add the reduced glutathione, oxidized glutathione and PMSF to the cold folding buffer.
- Dissolve the peptide in DMSO. Weigh 15mg of peptide and add it to 500µl DMSO in an Eppendorf tube. Note: If the peptide is insoluble in DMSO, add successive small amounts of TCA (100% solution) (~.05ml) until it dissolves. Alternatively, it is possible to use TFA.
- Add the peptide to the stirring reaction.
- Load the inclusion bodies into two syringes. Load 500 nmol heavy chain and 1000 nmol hub2m into two separate disposable 3cc syringe using a 20gauge needle.
- Place the folding reactions on a stir plate and inject the inclusion bodies. Place the folding reaction on a stir plate set at high speed. Replace the 20g needle with a 26g needle. Forcefully inject the heavy chain and the light chain into the reaction as close to the stirring bar as possible.
- Incubate the folding reaction overnight at 10°C. Shake the folding reaction in a refrigerated incubator/shaker at 70rpm and 10°C and incubate for 1-3 days. If you do not have access to equipment that can maintain the temperature at 10 °C, you can incubate the folding reactions at 4 °C, such as on a magnetic stir plate in a cold room.
Day 2
- In the morning, load and inject heavy chain into the folding reaction. Load 500nmol heavy chain into a 3cc syringe using a 20gauge needle. Inject the heavy chain forcefully into the reaction as close to the stirring bar as possible.
- Store the folding reaction at 70rpm and 10°C all day.
- In the evening, load and inject heavy chain into the folding reaction. In the evening, load 500nmol heavy chain into a 3cc syringe using a 20g needle. Inject the heavy chain into the reaction as described above.
- Incubate the folding reaction overnight at 10°C. Shake the folding reaction at 70rpm and 10°C. Store overnight. It is possible to incubate the folding reactions for a few additional days; deleterious side reactions—such as proteolysis of the BSP tag—appear to be very slow in folding buffer.
Step 5: Class I MHC Tetramer Preparation: Folding Reaction Concentration and Biotinylation
At the end of the incubation of the class I MHC/peptide folding reaction, the folded protein is concentrated by ultrafiltration, the buffer is exchanged on disposable PD-10 columns containing G25 resin, and the BSP tag is biotinylated by the BirA enzyme. In the past, we would perform the biotinylation reaction after purification of the folded protein on a Sephacryl S300 column (or a Superdex S200 column), but we find that the protocol described here allows us to omit a couple of subsequent steps, saving time and probably improving the final yield.
Materials and Equipment
Reagents
- 1mg/ml Leupetin stock
- 1000x Pepstatin
- 100mM PMSF
- 100mM ATP (5mM final concentration)
- 100mM Biotin
- BirA enzyme (Avidity, or homegrown)
Biotinylation Buffer
- 100mM Tris (pH 7.5)
- 200mM NaCl
- 5mM MgCl2
- Adjust pH to 7.5
Note that Avidity recommends a bicine-based BirA reaction buffer at pH 8.3. Avidity's buffer was derived from kinetic optimization experiments with either small molecule substrates, or BSP tagged proteins. We have not switched to the pH 8.3 buffer for several reasons: (1) our buffer works; and (2) we are concerned about the stability of the MHC peptide complexes at pH 8.3, including susceptibility to competing proteolytic reactions. We have not systematically investigated any of this.
Equipment and Supplies
- Refrigerated benchtop centrifuge.
- High speed centrifuge, with a rotor that can take 250 ml bottles.
- Nitrogen gas cannister and appropriate regulator
- Millipore Amicon 8400 Stirred Cell (Cat. No. 5124)
- Biomax PB Polyethersulfone Ultrafiltration Membranes 10,000 NMWL (Cat. No. PBGC07610), Millipore
- Amicon Ultra-15 PLGC Centrifugal Filter Unit 10,000 NMWL (Cat. No. UFC901024, pack of 24)
- PD-10 desalting columns from GE (cat# 17-0851-01)
- LabMate PD-10 Buffer Reservoir (cat# 18-3216-03)
Concentration Protocol
- Centrifuge folding reaction to remove precipitated protein. Prior to concentration, separate the folding reaction into three equal parts and distribute among three centrifuge tubes. Centrifuge the folding reaction at 13000 rpm for 15min. Use Beckman 250ml tubes with appropriate Beckman lids. This step removes precipitated protein that can clog the ultrafiltration membrane in the next step.
- Assemble Amicon 8400 concentrator. Place a Biomax membrane (NMWL: 10k) in a clean Amicon 400ml stir cell (model 8400) with the shiny side of the membrane facing up. Place an O-ring gasket between the base of the cell and the membrane to secure the membrane in place. Screw the body of the cell onto the base with the volume scale on the same side as the eluate tubing protuberance.
- Add folding reaction supernatant to concentrator. Add the centrifuged supernatant of the folding reaction to the concentrator cell and place the lid of the cell onto the body of the concentrator. Confirm that the gasket in the lid is both present and intact.
- Attach concentrator to N2 gas tank. Attach the lead from the N2 gas tank to the lid of the concentrator. Place the pressure-release switch in the vertical position. (This switch can be turned horizontally to release the pressure in the concentrator.) Turn on the gas slowly such that the pressure increases to a maximum of 60 to 65psi.
- Concentrate the folding reaction to 7.5ml and stop the N2. Note: To concentrate the folding reaction to precisely 7.5ml, measure the volume of the concentrate after it has fallen well below the 50ml mark on the concentration flask (circa 20ml). Use a small graduated vessel (i.e. 15ml polypropylene falcon tube) in lieu of the collecting bottle and monitor the progress of elution.
Buffer Exchange Protocol
At this point, the folding buffer is rapidly exchanged, and is replaced with BirA reaction buffer.
- Centrifuge concentrated folding reaction. Place the concentrate of the folding reaction into a 25ml centrifuge tube. Centrifuge the concentrate for 10min at 15300 rpm at 4°C. This will remove any precipitate that might have accumulated during the concentration of the folding reaction. Often, we will perform this step by aliquotting the entire sample to several microcentrifuge tubes, followed by pooling of the supernatant.
- Prepare three PD-10 Sephadex G-25 M columns. Equilibrate each of the three PD-10 (Amersham Pharmacia #17-0851-01) columns by adding 5ml of biotinylation buffer to each tube five times (25ml total volume per column). Note that Amersham/Pharmacia now sells convenient 25 ml reservoirs for equilibration of their PD-10 columns.
- Add 2.5ml of protein to each column. Allow the flow-through to go into the waste.
- Place a 15ml polypropylene tube below one of the three columns. This tube will catch the flow-through of each of the tubes.
- Successively, add 3.5ml biotinylation buffer to each column. The biotinylation buffer will elute the protein from the column. Prior to each successive addition of biotinylation buffer, place the polypropylene tube below the column. Alternatively, elute the protein into three tubes and pool the contents. The protein should be at a final total volume of 10.5ml.
Biotinylation
- Add the following to the eluate (10.5ml):
- 500 µl ATP (100mM stock)
- 40 µl Biotin (100mM stock)
- 10 µl Leupeptin (1000x stock)
- 10 µl Pepstatin (100x stock)
- 20 µl PMSF (0.1M stock)
- 20 µl BirA enzyme (stock at ~ 1 mg/ml).
We recognize that with this protocol, we do not know the enzyme/substrate ratio. However, we still believe that biotinylation at this stage is convenient and saves time in the end.
- Mix by gentle inversion and incubate at room temperature for 12 hours (overnight). If the temperature of your lab is variable (as is ours!), you might consider placing your sample in a water bath maintained at 20 °C in a cold room. A slight precipitate might form during the BirA reaction. This is not cause for alarm. The precipitate is removed by centrifugation at the beginning of the next sub-protocol.
Step 6: Tetramer Production: Purification of Biotinylated MHC Protein by S300 Column Chromatography
The steps described on this page and on the MonoQ and biotinylated monomer storage pages should be performed as rapidly as possible, to minimize the potential for proteolysis of the purified, biotinylated MHC protein. After enzymatic biotinylation, a preparative gel filtration column is run that serves two purposes:
- Removal of excess free biotin that can interfere with subsequent tetramer formation; ATP, which can interfere with accurate protein concentration determinations by spectrophotometry, is also removed
- Removal of aggregated protein that did not precipitate during previous steps.
We originally used a Superdex 200 26/60 column for this step. A number of years ago, we replaced this column with a Sephacryl S300 26/60 column, which gave us equivalent separation for our particular sample, but cost between 1/5 and 1/10 the price of the Superdex column.
The instructions below are specific to an old Pharmacia FPLC system. Of course, if you have a different chromatgraphy system in your lab, you should adjust the protocol accordingly.
Finally, one comment on the importance of fresh buffers. In our experience, the most common problem with tetramer preps is proteolytic cleavage of the BSP (BirA substrate peptide) by contaminating proteases. Whenever we see this in the lab, the first things that we replace are the biotinyaltion buffer and the column chromatography buffers. Almost always, this solves the problem. Now, we routinely replace the column chromatography buffers at least every two weeks, if not more often.
Reagents
- Buffer A: 20 mM Tris, pH 8.0
- Buffer B: 20 mM Tris, 500 mM NaCl, pH 8.0
- Sephacryl S300 26/60 column (cat# 17-1196-01)
I. Preparation of the FPLC system
- Check the levels of buffer A (20mM Tris, pH 8) and buffer B (20mM Tris, pH 8, + 500mM NaCl) in their reservoirs (usually 1 or 2 liter bottles). You should have at least 500 ml of each before proceeding. See notes above about the freshness of the buffers.
- Attach the 10ml super loop (brown coil) to valve 1 (positions 2 and 6). The Pharmacia system comes with a 10 ml piston-style "Superloop". We have replaced this with a 10 ml loop of PEEK tubing that we obtained from Upchurch. We had to replace the fittings with Pharmacia-compatible M6 fittings, which we also obtained from Upchurch. Although this loop takes slightly more manual pressure to load than does the Pharmacia Superloop, it is much easier to rinse in situ, so we don't have to take it off to clean it. It is essential to take two precautions prior to injecting your protein into these loops. First, you must make sure that it does not contain protein and salt from the previous run that might contaminate your samples. Second, you must make certain that the loop does not contain air bubbles prior to injecting your sample. See the steps below, which describe this thoroughly. Finally, remember to wash out the sample needle prior to loading your syringe. Always use common sense measures to avoid cross-contamination.
- Prior to injecting the sample into the column, centrifuge it for 10 minutes at 15300 rpm and 4 °C. We usually split the sample into 5-6 separate eppendorf tubes for this, which has the advantage that they are disposable and always handy. This can also be done in one large tube that is rated for this g-force; most Falcon tubes (15 and 50 ml) are not. Carefully transfer pool the supernatants from each tube into a single 50 ml polypropylene tube.
- Note: When working at the bench, keep the sample and all buffers/reagents on ice (~4 °C).
II. Washing the loop
- Turn keypad on. Press [MANUAL] button on the FPLC LCC-500 to turn the keypad on.
- Set the injection and column selector valve positions. Press [STEP FORWARD] button three times to open the valve mode. Close valve 1 by setting it to position 2 by entering [1.2] followed by [STORE]. Set the column selector valves to bypass all columns (position 1 on our Valves 4 and 5).
- Remove the needle from the injection port. The needle should only be removed from the injection port when valve 1 is closed. Closing valve 1 prevents air from entering the line and subsequently being injected into the column.
- Fill the syringe with wash buffer and insert the needle into the FPLC injection port. Wash a 10ml syringe with 20mM Tris (pH 8) thoroughly. Fill the syringe with 10ml of 20mM Tris (pH 8), remove all excess air bubbles and insert the needle into the injection port. Do not inject the wash buffer yet!
- Open valve 1 and inject the washing reagent. Open valve 1 by setting it to position 1 (press [1.1] then [STORE]). Inject the 20mM Tris into the 10ml loop being careful not to bend or break the needle.
- Set the flow mode. Press the [STEP BACKWARD] button three times to the flow mode (ML/MIN) and set the flow by pressing [4.0] then [STORE].
- Close valve 1. Press the [STEP FORWARD] button to the valve mode and close valve 1 by setting it to position 2 (as described above). The loop should drip at a rate of 4ml/min.
- Repeat wash. After the loop has been washed (~5 min.), remove the syringe and repeat the above procedure for washing the loop.
III. S300 Column Chromatography
- Close valve 1, fill the needle and insert it into the injection port. Press [STEP FORWARD] button three times to open the valve mode. Close valve 1 by entering [1.2] followed by [STORE]. Remove the syringe from the injection port and fill it with the biotinylated sample (10.5ml).
- Open valve 1 and inject the sample. Insert the syringe into the injection port and set valve 1 to position 1. Inject the sample into the super loop and press [END]
- Set up fraction collector rack. Fill the large fraction collector rack with 16 disposable 17x100 polypropylene tubes. Place the rack on the fraction collector. Align the arm such that the middle of the arrow is against the center of the first tube.
- Set the fraction collector. Set the fraction size by pressing [FRACTION SIZE], [4] and [STORE RETURN]. Set the peak fraction size by pressing [PEAK FRAC. SIZE], [4] and [STORE RETURN]. Set the delay by pressing[DELAY], [0.17] and [STORE RETURN].
- Start the S300 program. Open the FPLC computer program to run the S300 column. From the main menu, the program is located in the "S300" folder and entitled "S300prep."
- If you have more than 10.5 ml of sample, you can let the program run for less than 10 minutes, pause the program on the LCC500 control panel, temporarily set valve 1 to position 1, inject the remaining sample (less than a few ml - the total should be less than 15 ml), return the valve to position 1, and resume the program.
- Folded MHC proteins usually elute with a peak at about 200 ml. You should pool the appropriate fractions in a 50 ml Falcon polypropylene tube. Usually, this will be about 4 fractions.
IV. Tris buffer exchange This step is required to reduce the salt concentration in preparation for chromatography on the MonoQ column.
- Add the entire sample to an Amicon Ultra-15 centrifuge filtering device (MWCO: 10k) and centrifuge at 3080rpm at 4 °C until the sample volume reaches approximately 500 µl. Discard the filtrate collected in the bottom half of the device (though you can save it in a 50 ml tube, if you are nervous).
DO NOT DISCARD THE PROTEIN IN THE TOP HALF OF THE DEVICE.
- Fill the Ultra-15 centrifuge filtering device with 20mM Tris (pH 8.0), carefully cap tightly, mix by inversion and centrifuge at 3080rpm at 4 °C until the sample volume reaches approximately 500 µl. Again, discard the filtrate in the bottom half of the device.
- Repeat the above-described buffer exchange once.
- With a glass pasteur pipette, carefully transfer the concentrated sample to an eppendorf tube and centrifuge at 15300 rpm for 15 minutes at 4 °C.
- As quickly as possible, proceed to the final “polishing” purification of the MHC protein on the MonoQ. Keep the protein on ice until it is injected on the MonoQ column.
Acknowledgements
Protocol development: The Altman Lab.
Protocol writeup: based extensively upon a version produced by Sophia Albott.
Step 7: Tetramer Preparation: MonoQ Purification of Biotinylated MHC/peptide Monomers
Preparation
- Check the levels of Buffer A (20mM Tris, pH 8) and buffer B (20mM Tris, pH 8, and 500mM NaCl).
- Attach the 2ml super loop to valve 1.
- Note: When working at the bench, keep the sample and all buffers on ice (~4°C).
Washing the loop
- Turn keypad on. Press [manual] button on the FPLC to turn the keypad on.
- Close valve 1. Press [step forward] button three times to open the valve mode. Close valve 1 by setting it to position 2 by entering [1.2] followed by [store].
- Remove the needle from the injection port. The needle can only be removed from the injection port when valve 1 is closed (i.e. in position 2). Closing valve 1 prevents air from entering the line and subsequently being injected into the column.
- Wash, fill and insert the needle into the injection port. Wash a 3ml syringe with 20mM Tris (pH 8) thoroughly. Fill the syringe with 2ml of 20mM Tris (pH 8), remove all excess air bubbles and insert the needle into the injection port.
- Open valve 1 and inject the sample. Open valve 1 by setting it to position 1 (press [1.1] then [store]). Inject the 20mM Tris into the 2ml loop being careful not to bend or break the needle.
- Set the flow mode. Press the [step backward] button three times to the flow mode (ml/min) and set the flow by pressing [4.0] then [store].
- Close valve 1. Press the [step forward] button to the valve mode and close valve 1 by setting it to position 2 (see above instructions). The loop should drip at a rate of 4ml/min.
- Repeat wash. After the loop has been washed, remove the syringe and fill it with 2ml of 20mM Tris (pH 8.0). Repeat the above procedure for washing the loop.
Running the protein sample
- Close valve 1, fill the needle and insert it into the injection port. Press [step forward] button three times to open the valve mode. Close valve 1 entering [1.2] followed by [store]. Remove the syringe from the injection port and fill it with 500ml 20mM Tris (pH 8.0) and the centrifuged biotinylated sample from the buffer exchange (concentrated to 500ml). The total volume to be injected is 1ml.
- Open valve 1 and inject the sample. Insert the syringe into the injection port and set valve 1 to position 1. Inject the sample into the super loop and press [end].
- Set up fraction collector rack. Fill the large fraction collector rack with 42 disposable 1.5ml polypropylene tubes. Place the rack on the fraction collector. Align the arm such that the middle of the arrow is against the center of the first tube.
- Set the fraction collector. Set the fraction size by pressing [fraction size], [1] and [store return]. Set the peak fraction size by pressing [peak frac. size], [1] and [store return]. Set the delay by pressing[delay], [0.34] and [store return].
- Run MonoQ program. Open the FPLC computer program to run the MonoQ column. From the main menu, the program is located in the “MonoQ” folder and entitled “MamuA11.”
Step 8: Tetramer Preparation: Preparation and Storage of Biotinylated Monomer Stocks
PBS Buffer
- 35 ml 1X PBS
- 35 µl 1mg/ml Leupeptin
- 35 µl 1000X Pepstatin
- 140 µl 0.5M EDTA (final concentration: 2mM)
PBS Buffer exchange:
- Collect sample fractions and centrifuge. From the MonoQ figure, collect the correct fractions and pour them into an ultrafree-4 centrifuge filtering device (MWCO: 10k). Centrifuge at 3080g at 4(C until the entire collected sample volume is below 1ml.
- Add PBS Buffer and centrifuge. Add the PBS Buffer to the ultra-free centrifuge filtering device and mix by inversion. Centrifuge until the sample volume is below 500 µl.
- Repeat the afore-described buffer exchange once.
- Transfer the sample to an eppendorf tube and store on ice or at 4(C.
- Take UV scan of the sample. Dilute a sample of the monomer by 1:50 or 1:100 (final volume: 100 µl) and take a UV scan from 240nm to 320nm.
- Calculate the concentration of monomers. This can be done by entering the values from the UV scan for 260, 280 and 320 AU into the appropriate sections of the Altman tetramer database. The database will calculate the amount of PBS buffer to be added to the monomer sample to achieve a concentration of 2mg/ml.
- Dilute the monomer sample to 2 mg/ml with PBS buffer.
- Aliquot the monomers to 100 µl fractions.
- Quick freeze the monomers and store at -80 °C. Use liquid nitrogen to quick freeze the monomers. Enter the location of the monomers into the "Tetramer Stocks" database.
Step 9: Biotinylation Assay
Procedure
- Add 3 µl of the diluted monomer sample (2 mg/ml) to 12 µl of 1X PBS (final concentration: 0.4 mg/ml)
- Label two Eppendorf tubes as "+" and "-" and add 5 µl of the above monomer preparation.
- Add 5 µl of 0.8-1mg/ml Streptavidin to the tube labeled "+".
- Add 5 µl of ddH2O to the tube labeled "-".
- Incubate both samples at room temperature for one hour.
- Add 10 µl of 2X loading buffer (non-reducing) to each sample.
- Do not boil or add DTT to either sample.
- Prepare and run a 12% SDS-page gel for both "+" and "-" samples.
- Stain the gel with 20% acetic acid and 0.1% Commassie blue in 100% methanol.
- Destain the gel using 40% EtOH and 10% acetic acid.
Step 10: Tetramerization
General guidelines on tetramerization The following information is a generalization of how much labeled streptavidin to add to the biotinylated monomers at the last stage of the tetramer preparation. The actual amount of streptavidin to be added depends both on the molecular weight of the monomer as well as the percent biotinylation. It is necessary to divide this amount by ten to arrive at the amount to be added per time interval.
The procedure of adding the streptavidin over 10 time intervals is designed to maximize tetramer formation. At early additions, the biotinylated MHC will be in excess and will saturate all of the avidin. At the conclusion of the streptavidin addition, there may be an excess of avidin, however, the assumption is that most of the MHC will have gone into tetramers. If the streptavidin was added at one time and was in excess, the resulting solution would be more likely to exist as a mixture of monomers/dimers/trimers.
This approach is summarized in the figure below.
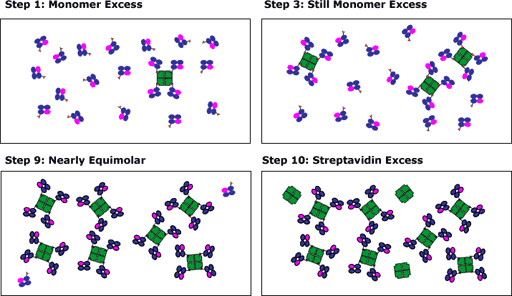
- After step 1, biotinylated monomer is present in vast excess, and all the biotin binding sites on the added streptavidin are occupied with MHC monomer
- After step 2, biotinylated monomer is still present in excess, and all the biotin binding sites on the added streptavidin are occupied with MHC monomer.
- After step 9, the concentrations of biotinylated monomer and biotin binding sites on the streptavidin are nearly identical. Note that for this example, we have consciously overestimated the concentration of biotinylated monomer. Normally, we try to shoot for "equimolarity" at step 10.
- The addition of streptavidin in steps 10 adds excess streptavidin, which remains free. The excess streptavidin will not bind to cells when used in staining reactions. Of course, it could increase the staining background, but it won't be in vast excess, so its contribution to the background noise will be minimal.
Theory
Our standard storage conditions for biotinylated monomer stocks are 100 µl at 2 mg/ml, for a total of 200 µg of MHC protein. For the purposes of calculation of how much streptavidin to add, we usually assume 100% biotinylation. Even if we are wrong, the worst that can happen is that you'll waste a bit of streptavidin; it probably won't add much to the background.
We use streptavidin-PE (PJRS25) and streptavidin-APC (PJ27S) from Agilent. These are adjusted to a concentration of 1 mg/ml, which refers to the total weight of the conjugate. We assume a 1:1 ratio of streptavidin to phycobiliprotein, and we have calculated the concentration of biotin binding sites in these stocks. This is an estimate, but the addition protocol is devised to provide good results even if our estimates are off. In practice, we find that this procedure is very robust.
Tetramerization Protocol
The addition of streptavidin to the biotinylated monomers is performed at room temperature, with the samples kept in the dark between additions (usually in a drawer). The protocol will probably also work if the samples are kept on ice. The key is to add the streptavidin in small subaliquots, and to mix thoroughly (but gently) after each addition. The streptavidin volumes listed below are appropriate for 200 µg aliquots of biotinylated MHC.
- Streptavidin-APC (1 mg/ml):
Add 17.4 µl of marker to the monomer solution every 10 minutes for a total of 10 times - Streptavidin-PE (1mg/ml):
Add 31.8 µl of marker to the monomer solution every 10 minutes for a total of 10 times.
These volumes are intended for class I MHC monomers at 2 mg/ml. You can contact tcf.scientific.support@emory.edu for specific amounts of conjugate to be added to your biotinylated monomers.
Step 11: Notes on Tetramer Nomenclature
When you are reporting results from tetramer stains, how should you refer to the tetramer you used?
Many approaches have been used, and there is no perfect way to do it. Usually, the trade off is between a nomenclature that specifices the reagent completely and unambiguously—but which is therefore unwieldly—and shorthand nomenclatures that are ambiguous and that may "break" over time as new epitopes are described. The approach we usually use is a compromise.
Considerations in Tetramer Nomenclature
- There are three components that determine the specificity of a classical class I MHC tetramer: the heavy chain, the beta-2-microglobulin, and the antigenic peptide.
- The species of the b2m subunit is not usually specified in most tetramer nomenclatures. The beta-2-microglobulin component can be matched to the species of the heavy chain, but more often than not, we use human beta-2-microglobulin, even when the heavy chain is from species such as the mouse.
- Naming of the heavy chain is usually straightforward. For human reagents, the "HLA" prefix is often eliminated, and alleles are referred to by shorthand names, such as A2, B27, B57, etc. This can be done for other primate species as well, though it is not uncommon to include prefixes such as "Mamu" for rhesus macaque reagens and "Patr" for chimpanzee reagents. For mouse reagents, heavy chains are usually referred to with nomenclatures such as D(b), K(b), L(d), etc.
- From the beginning, naming of the peptide has often been haphazard and has been done carelessely. For example, in the first tetramer paper, we referred to one reagent as "A2/gag". In the context of the original publication, it was obvious that this referred to the HIV gag protein, and most experts in the field understood this to refer to the immunodominant SLYNTVATL epitope that started at the 77'th amino acid of the gag protein. However, in hindsight, it is possible that other A2-restricted epitopes might be found in gag, making our original nomenclature ambiguous. As a consequence, we now favor a nomenclature such as "A2/HIV.gag.77-85", which indicates the pathogen and protein source of the epitope, as well as its position in the sequence. Of course, even this nomenclature has its faults, as it's long and doesn't account for possible mutations, etc., but we believe it's the best of a bad lot.